


Formatting the Manuscript#
The Manuscript Build Settings tool has a Headings page and a separate Formatting page. This chapter covers both.
Headings#
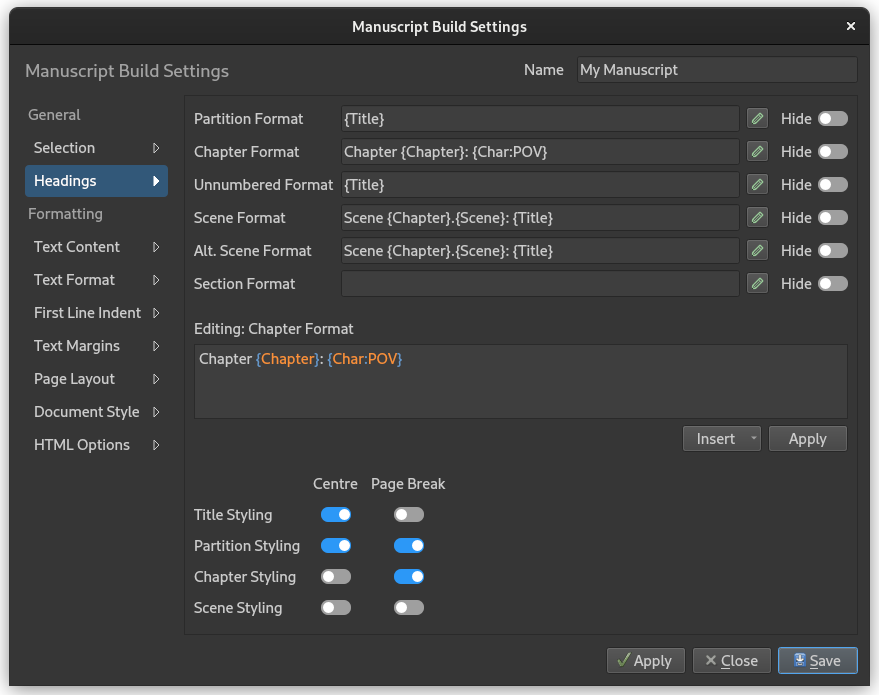
The Headings page of the Manuscript Build Settings dialog.#
The Headings page of the Manuscript Build Settings dialog allows you to set how the
headings in your Novel Documents are formatted. By default, the title is just copied as-is,
indicated by the {Title} format. You can change this to, for instance, add chapter numbers and
scene numbers, or insert character names, as shown in the figure above.
Clicking the edit button next to a format will copy the formatting string into the edit box where it can be modified, and where a syntax highlighter will help indicate which parts are automatically generated by the build tool. The Insert button is a dropdown list of these formats, and selecting one will insert it at the position of the cursor.
Any text you add that isn’t highlighted in colours will remain in your formatted titles.
{Title} will always be replaced by the text in the heading from your documents.
Code |
Description |
|---|---|
|
Insert a line break. |
|
Insert the original title text. |
|
Insert a chapter number. |
|
Insert a chapter number as a word. |
|
Insert a chapter number as an upper case Roman numeral. |
|
Insert a chapter number as a lower case Roman numeral. |
|
Insert a scene number within the current chapter. |
|
Insert a scene number unique to the whole manuscript. |
|
Insert the point-of-view character’s display name. |
|
Insert the focus character’s display name. |
You can preview the result of these format strings by clicking Apply, and then clicking Preview in the Manuscript Build tool main window.
Note
The language used for generating chapter numbers is defined by the project language set in Project Settings. This feature relies on translation files existing for each language. If you want to help add new languages to novelWriter, see: Contributing.
Automatic Numbering#
The headings formatter allows you to automatically insert chapter and scene numbers into your headings. The automatic chapter number counter will skip all chapter headings marked as unnumbered using the heading format described in Heading Levels.
Scene numbers are mostly intended for use in a draft manuscript. You can either insert absolute scene numbers that count every scene in the novel, or you can insert per-chapter scene numbers that reset to 1 for each new chapter.
Example
This will create a chapter title on the format “Chapter 1: Title Text”:
Chapter {Chapter}: {Title}
This will create a scene title on the format “Scene 1.1: Title Text”:
Scene {Chapter}.{Scene}: {Title}
Scene Separators#
If you don’t want any titles for your scenes (or for your sections if you have them), you can leave the formatting boxes empty. If so, an empty paragraph will be inserted between the scenes or sections instead, resulting in a gap in the text. You can also enable the Hide setting, which will ignore them completely. That is, there won’t even be an extra gap inserted.
Alternatively, if you want a separator text between them, like the common * * *, you can enter
the desired separator text as the format. If the format is any piece of static text, it will always
be treated as a separator. A static separator is only inserted between scenes, as opposed to a
formatted heading which is also inserted before the first scene of a chapter.
A special case of the static separator is the horizontal line, which is inserted by using the
---- format. There is also an option for it in the Insert dropdown list. This will
replace all the text in the edit box with four hyphens. Only if the format is exactly four hyphens
will it be treated as a horizontal line.
In the output formats, the horizontal line is rendered as a line at 50% the text width or the page width. The exception is for Markdown output, where it is printed as-is.
Hard and Soft Scenes#
If you wish to distinguish between so-called soft and hard scene breaks, you can use the alternative scene heading format in your text. You can then give these headings a different formatting in the Headings settings.
See Heading Levels for more information on how to format alternative scene headings in your text.
Heading Level Promotion#
When you build the manuscript, novel headings are promoted one level relative to the level specified in the source documents as typed in the editor. The promotion follows these rules:
The main novel title and partition titles are converted to regular text paragraphs with a larger font size.
Chapter titles are promoted to the top-most heading of the document, that is level 1.
Scenes and Section titles, if used, are promoted to level 2 and 3, respectively.
Headings in note documents are left as-is.
Title Styling#
The Manuscript Build Settings dialog also provides layout options for controlling how headings are visually presented in the output. These options allow you to add page breaks and centre headings at specific heading levels.
The layout options are presented in a grid showing the following heading styles:
Title – The novel’s main title
Partition – Partition headings (for dividing the novel into major sections)
Chapter – Chapter headings
Scene – Scene headings
For each of these, you can toggle:
Centre – Centre the heading text on the page
Page Break – Insert a page break before the heading
These settings apply to the formatted heading output and affect all document formats that support page breaks and text alignment.
Formatting Options#
The Formatting section in the Manuscript Build Settings dialog is split into groups, each accessible from its own entry in the sidebar. The sections below summarise what each group controls.
- Text Content
Controls which parts of the text in each selected document are included in the output. These options do not select documents, that is done in the Selection page. They only control which content elements within each document are rendered. The available switches are: “Include body text”, “Include synopsis”, “Include comments”, “Include story structure”, “Include manuscript notes”, and “Include keywords”. A text field for specifying keywords to ignore is also provided, as well as an option to “Add titles for note root folders”.
- Text Format
Controls the base appearance of rendered text. Set the “Text font” and “Line height”, and toggle options for “Justify text margins”, “Justify text on manual line breaks”, “Replace Unicode characters”, “Replace tabs with spaces”, “Preserve hard line breaks”, and “Apply dialogue highlighting”.
- Heading Format
Controls visual formatting applied to all headings in the output. Toggle “Add colours to headings”, “Bold headings”, and “Uppercase headings”.
- First Line Indent
Controls paragraph indentation. Toggle “Enable indent”, set the “Indent width”, and choose whether to “Indent first paragraph” (the paragraph immediately following a heading).
- Size & Margins
Controls font sizes and spacing for each element in the output. Entries cover “Title and Partition”, “Heading 1 and Chapter”, “Heading 2 and Scene”, “Heading 3 and Section”, “Heading 4”, “Text paragraph”, and “Scene separator”. Each entry has a size field and top and bottom margin fields. The option “Add empty lines instead of margins” replaces spacing with blank lines, which is useful for formats that do not support paragraph margins.
- Page Layout
Controls paper settings for formats that support page layout, such as Open Document and PDF. Set the “Unit” (centimetres, millimetres or inches), “Page size”, and “Page margins” (top, bottom, left, and right).
- Document Style
Controls document-level settings for office type documents. Set the “Page header” format, the “Page counter offset”, and optionally override the document language with “Override document language”.
- HTML Options
Controls settings specific to HTML output. Toggle “Add CSS styles” to include inline stylesheet rules, and “Preserve tab characters” to keep tabs rather than converting them to spaces.