

Building the Manuscript#
You can at any time build a manuscript, an outline of your notes, or any other type of document from the text in your project. All of this is handled by the Manuscript Build tool. You can activate it from the sidebar, the Tools menu, or by pressing F5.
Note
The term “Build” in this context means to assemble or generate a single document from a selection of your project documents. You can select between multiple standard document formats.
Added in version 2.1: This tool is new for version 2.1. A simpler tool was used for earlier versions.
The Manuscript Build Tool#
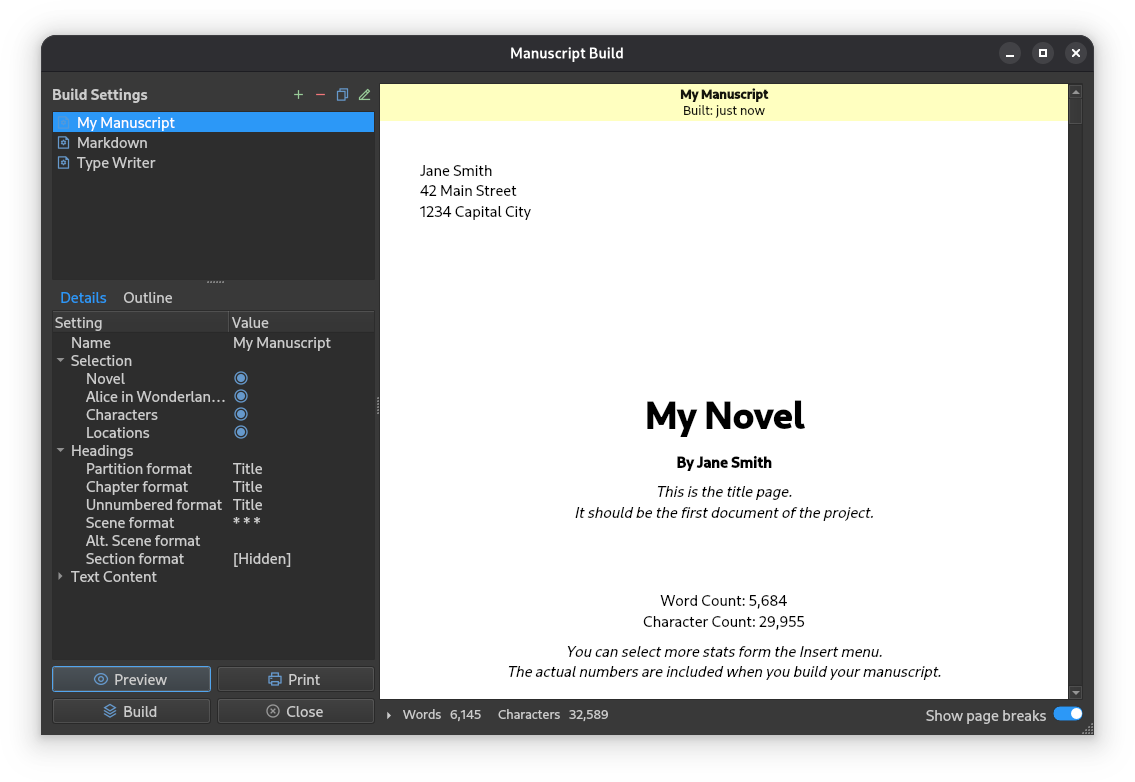
The Manuscript Build tool main window.#
The main window of the Manuscript Build tool contains a list of all the builds you have defined, a selection of settings, and a few buttons to generate a preview, open the print dialog, or run the build to create a manuscript document.
Outline and Word Counts#
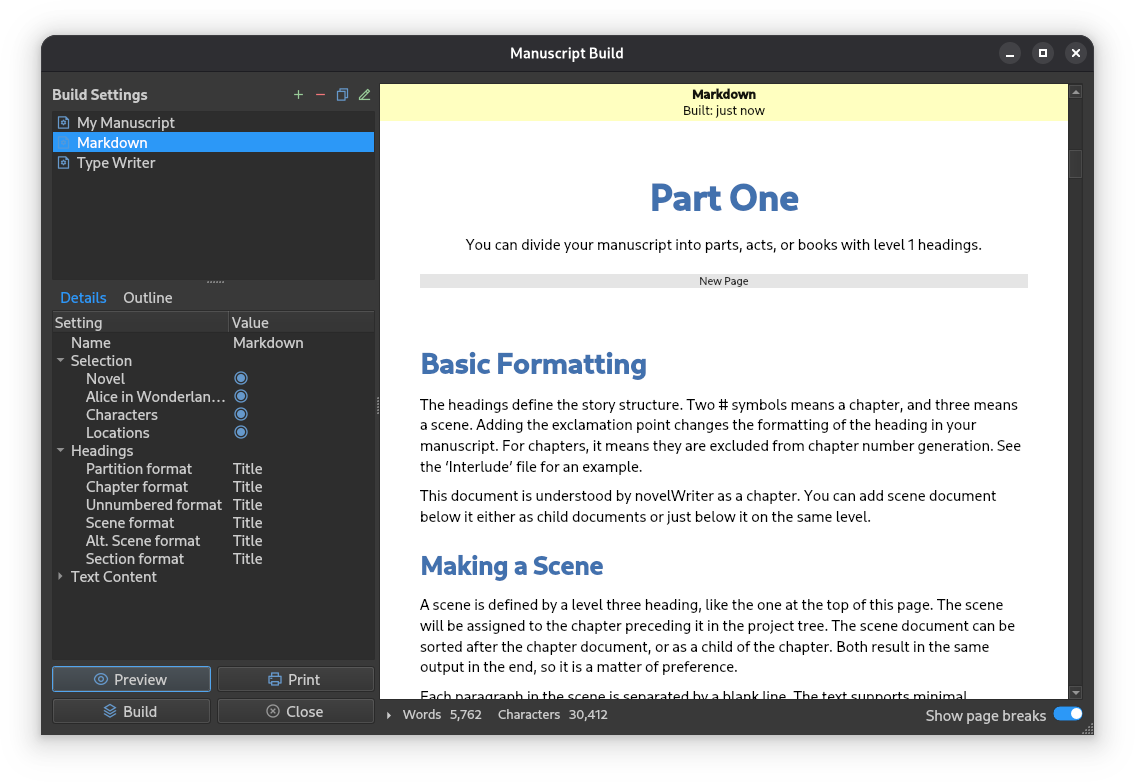
The Manuscript Build tool main window with the Outline visible.#
The Outline tab on the left lets you navigate the headings in the preview document. It will show up to scene level headings for novel documents, and level 2 headings for notes.
A collapsible panel of word and character counts is also available below the preview pane. These are calculated from the text you have included in the document, and are more accurate counts than what’s available in the project tree since they are counted after formatting.
For a detailed description on how they are counted, see Word and Text Counts.
Build Settings#
You can edit a build definition by opening it in the Manuscript Build Settings dialog, either by double-clicking or by selecting it and pressing the edit button in the toolbar.
Tip
You can keep the Manuscript Build Settings dialog open while testing the different options, and just hit the Apply button to update the preview in the main Manuscript Build window. When you’re happy with the result, you can close the settings.
For detailed information on how to format headings, including how to add chapter numbers, scene numbers, and other dynamic content, see Formatting the Manuscript.
Document Selection#
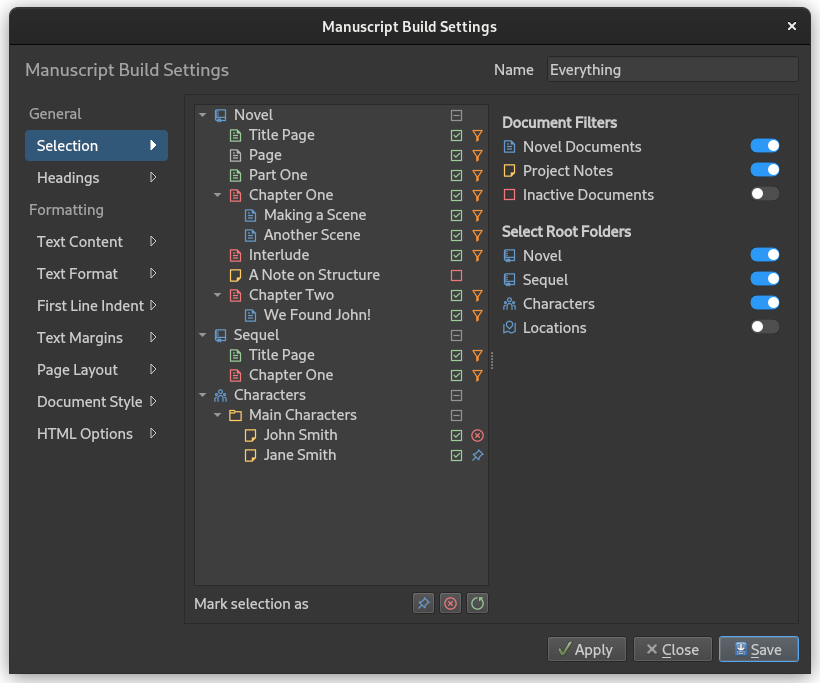
The Selections page of the Manuscript Build Settings dialog.#
The Selections page allows you to fine tune which documents are included in the build. The included documents are indicated by an icon in the last column. The interface is split into two parts: a project tree on the left showing all documents, and filter options on the right.
You can override the result of these filters by marking one or more documents and selecting to explicitly include or exclude them by using the buttons below the tree view. The last button can be used to reset the override and return control to the filter settings.
In the figure, the orange icon and the blue icon indicate which documents are included, and the red icon indicates that a document is explicitly excluded.
By default, inactive documents are excluded, but you can override this in the filter settings. See Active and Inactive Documents for more details.
Root Folder Selection#
At the bottom of the filter options on the right, you will find a set of switches for each root folder in your project. These allow you to quickly include or exclude entire root folders from the build. For example, you can use this to exclude all your notes if you only want the novel content, or exclude all story content if you want to build an outline of your notes instead.
When a root folder switch is off, all documents within that folder are excluded regardless of the other filter settings.
Content Filtering#
The options in Document Selection and Root Folder Selection decide which whole documents are part of the build.
The content filtering options in the Formatting page are different: they only control which parts of the selected documents are included in the output.
For further content filtering options, see Formatting Options.
Build Management#
The main Manuscript Build tool window provides several controls for managing your build definitions:
- Create a New Build
Press the Add button (or plus icon) in the toolbar to create a new build definition. A new build will be created with default settings that you can then customise.
- Edit a Build
Double-click on a build in the list, or select it and press the Edit button to open the Manuscript Build Settings dialog.
- Duplicate a Build
Select a build and press the Duplicate button (or copy icon) to create a copy of it. This is useful for creating variations of a build without starting from scratch. The duplicated build will have “2” appended to its name.
- Delete a Build
Select a build and press the Delete button (or minus icon) to remove it. This action cannot be undone, so make sure you have saved any settings you want to keep.
- Reorder Builds
You can drag and drop builds in the list to change their order. The order is saved automatically when you close the tool.
Statistics View#
Below the preview panel, there is a collapsible statistics widget showing word and character counts for the current build. Press the expand button (arrow icon) to toggle between a minimal and detailed view.
The Minimal View shows:
Total word count
Total character count
The Detailed View shows:
Total words, words in titles, words in text
Total characters, characters in titles, characters in text
Total word characters (letters and numbers only), broken down by section
These statistics are calculated from the text you have included in the document after all formatting has been applied, making them more accurate than the counts available in the project tree. For a detailed explanation of how text is counted, see Word and Text Counts.
Building Manuscript Documents#
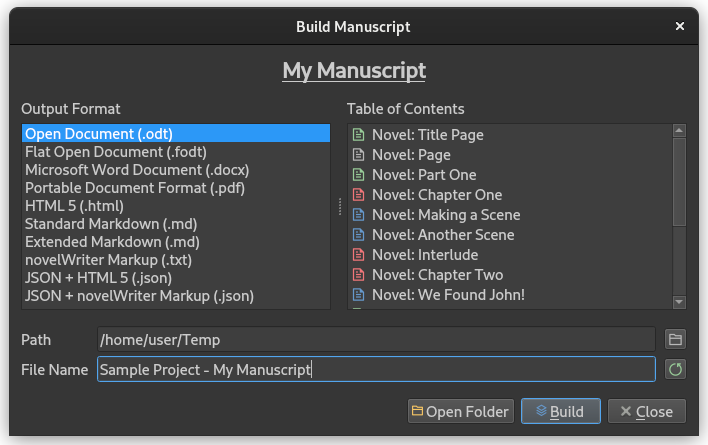
The Build Manuscript dialog used for writing the actual manuscript documents.#
When you press the Build button on the Manuscript Build tool main window, a special file dialog opens up. This is where you pick your desired output format and where to write the file.
On the left side of the dialog is a list of all the available file formats, and on the right, a list of the documents which are included based on the build definition you selected. You can choose an output path, and set a base file name as well. The file extension will be added automatically.
To generate the manuscript document, press the Build button. A small progress bar will show the build progress, but for small projects it may pass very fast.
File Formats#
The following document formats are supported:
- Open Document
The Build tool can produce either an
.odtfile, or an.fodtfile. The latter is just a flat version of the document format as a single XML file. Most rich text editors support the former, and only a few the latter.- Microsoft Word Document
The Microsoft Word Document format writes a single
.docxfile. It uses a fairly basic format that should be compatible with most rich text editors.- Portable Document Format (PDF)
The PDF is generated from a copy of the preview document, and should have the same formatting capabilities as the preview. It’s identical to what is produced if you select the print option and print to PDF.
- novelWriter HTML
The HTML format writes a single
.htmfile with minimal style formatting. The HTML document is suitable for further processing by document conversion tools like Pandoc, for importing in word processors, or for printing from browser.- Electronic Publication E-book (EPub)
The EPub format writes a single
.epubfile with minimal style formatting. You can include your notes in this format, but each notes root folder will be packaged as a chapter.- Standard/Extended Markdown
The Markdown format comes in both Standard and Extended flavour. The only difference in terms of novelWriter functionality is the support for strike through text, which is not supported by the Standard flavour.
- novelWriter Markup
This is simply a concatenation of the project documents selected by the filters into a
.txtfile. The documents are stacked together in the order they appear in the project tree, with comments, tags, etc. included if they are selected. This is a useful format for exporting the project for later import back into novelWriter.
Added in version 2.6: Microsoft Word and PDF output options were added.
Additional Formats#
In addition to the above document formats, the novelWriter HTML and Markup formats can also be wrapped in a JSON file. These files will have a meta data entry and a body entry.
The text body is saved in a two-level list. The outer list contains one entry per document, in the order they appear in the project tree. Each document is then split up into a list as well, with one entry per paragraph it contains.
These files are mainly intended for scripted post-processing for those who want that option. A JSON file can be imported directly into a Python dict object or a PHP array, to name a few options.
Printing#
The Print button allows you to print the content in the preview window. You can either print to one of your system’s printers, or select PDF as your output format from the printer icon on the print dialog.
Note
The paper format should default to whatever your system default is. If you want to change it, you have to select it from the Print Preview dialog.